If so, you'll be glad to know that the tried and true System Image
tool still exists in Windows 8 and as long as you have created a system
image of your hard disk,
you can use the System Image Recovery tool to recover your entire
system in the event of a hard disk failure.
In other words, if your hard disk goes south, you can purchase a new
hard disk and use the System Image Recovery tool to restore your system
to the state
it was in at the time that you created the image.
Now, keep in mind that for this type of backup to be truly effective,
you need to regularly create new System Images so that in the event of a
recovery,
you will have a recent version of your system.
I'll show you how to use System Image Recovery tool from the Recovery
Drive to restore your hard disk. As I do, I'll also show you how to
create a System Image on a set of optical discs.
What you need
In order to run the System Image Recovery tool as I'll describe in this
article, you'll need to have created a Recovery Drive as I showed you in
the article Create a Recovery Drive in Windows 8. You'll also need a set of optical discs or on an external drive on which to create a system image of your hard disk.
Creating a System Image
As I mentioned, in order to use the System Image Recovery tool you must
have created a system image of your hard disk. As such, I'll begin by
walking you through the steps required to create a system image.
To create a system image in Windows 8, you'll start by accessing the
oddly named Windows 7 File Recovery window. (Why not just call it File
Recovery or Windows Backup and leave it at that?) To do so, use the
[Windows] + W keystroke to access the Search Settings page. Then, type
Windows 7 File in the text box and click Windows 7 File Recovery, as
shown in Figure A.
Figure A
 Accessing the Windows 7 File Recovery tool from the Start screen is easy.
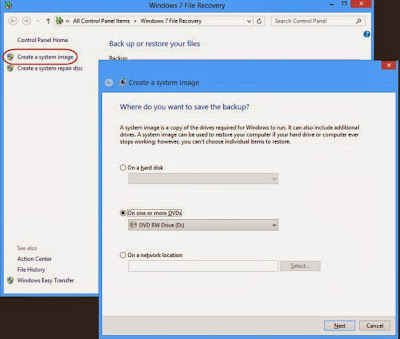
In a moment, you see the Windows 7 File Recovery user interface and you
should select the Create a system image command on the left side of the
screen to launch the creation tool. On the first screen you will need to
choose where you are going to create a system image. For my example, I
am going to create the system image on a set of DVD+R discs in the DVD
RW drive, as illustrated in Figure B.
Figure B
Accessing the Windows 7 File Recovery tool from the Start screen is easy.
In a moment, you see the Windows 7 File Recovery user interface and you
should select the Create a system image command on the left side of the
screen to launch the creation tool. On the first screen you will need to
choose where you are going to create a system image. For my example, I
am going to create the system image on a set of DVD+R discs in the DVD
RW drive, as illustrated in Figure B.
Figure B
 On my test system, I'll create the system image on a set of DVD+R discs.
When you click Next, you will be prompted to confirm your backup
settings, as shown in Figure C. As you can see, in addition to the main
partition, the System Reserved partition is also selected to be backed
up. On my test system, which is pretty bare bones at this point, the
system is indicating that the image will take up 36GB of space. (When
the operation was complete, the system image, with compression, only
required three 4.7GB DVD+R discs.) When you are ready, just click the
Start backup button.
Figure C
On my test system, I'll create the system image on a set of DVD+R discs.
When you click Next, you will be prompted to confirm your backup
settings, as shown in Figure C. As you can see, in addition to the main
partition, the System Reserved partition is also selected to be backed
up. On my test system, which is pretty bare bones at this point, the
system is indicating that the image will take up 36GB of space. (When
the operation was complete, the system image, with compression, only
required three 4.7GB DVD+R discs.) When you are ready, just click the
Start backup button.
Figure C
 On the Confirm your backup setting page take a look at the information presented and then click the Start backup button.
As Windows begins preparing for the operation, it will prompt you to
label and then insert the first DVD disc This process is illustrated in
Figure D.
Figure D
On the Confirm your backup setting page take a look at the information presented and then click the Start backup button.
As Windows begins preparing for the operation, it will prompt you to
label and then insert the first DVD disc This process is illustrated in
Figure D.
Figure D
 To get started, insert the first disc and click OK.
Once you insert the blank disc, you'll be prompted to format it. Make
sure that you select the Don't ask me again for this backup check box
before you click the Format button. The operation will then format the
optical media, as shown in Figure E.
Figure E
To get started, insert the first disc and click OK.
Once you insert the blank disc, you'll be prompted to format it. Make
sure that you select the Don't ask me again for this backup check box
before you click the Format button. The operation will then format the
optical media, as shown in Figure E.
Figure E
 Make sure that you select the Don't ask me again for this backup check box.
As the backup operation gets under way, you'll see progress indicators
letting you know the status of the operation, which includes
verification of the media once the backup portion is complete. After
each disc is verified, you'll be prompted to insert a new disc. This
process is illustrated in Figure F.
Figure F
Make sure that you select the Don't ask me again for this backup check box.
As the backup operation gets under way, you'll see progress indicators
letting you know the status of the operation, which includes
verification of the media once the backup portion is complete. After
each disc is verified, you'll be prompted to insert a new disc. This
process is illustrated in Figure F.
Figure F
 Creating a System Image on DVDs includes a verification operation.
When the System Image creation procedure is complete, you'll be prompted
to create a System Repair disc, as shown in Figure G. However, as you
may remember, a System Repair disc is the same as the Recovery Drive and
if you have already created a Recovery Drive, you can just click No and
you will be notified that the backup completed successfully.
Figure G
Creating a System Image on DVDs includes a verification operation.
When the System Image creation procedure is complete, you'll be prompted
to create a System Repair disc, as shown in Figure G. However, as you
may remember, a System Repair disc is the same as the Recovery Drive and
if you have already created a Recovery Drive, you can just click No and
you will be notified that the backup completed successfully.
Figure G
 In Windows 8, the System Repair disc is the same as the Recovery Drive.
Now that you have a System Image backup, you are ready for an emergency situation.
In Windows 8, the System Repair disc is the same as the Recovery Drive.
Now that you have a System Image backup, you are ready for an emergency situation.
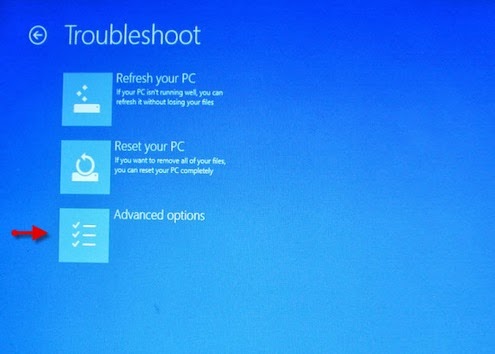
Launching System Image Recovery In the case of a hard drive failure, you can restore Windows 8 by running the System Image Recovery tool from the Recovery Drive. While I am booting from a USB Recovery Drive, you can just as easily boot the Recovery Drive from the optical disc. (As a part of my research for this article, I ran the System Image Recovery tool after booting from an optical disc and the procedure is basically identical.) After your system boots from the Recovery Drive and you are prompted to choose an option, select the Troubleshoot tile as shown in Figure H. Figure H
 When you are prompted to choose and option, select the Troubleshoot tile.
When you see the Troubleshoot screen, as shown in Figure I, select the Advanced options tile.
Figure I
When you are prompted to choose and option, select the Troubleshoot tile.
When you see the Troubleshoot screen, as shown in Figure I, select the Advanced options tile.
Figure I
 From the Troubleshoot screen, select the Advanced options tile.
When you see the Advanced options screen, as shown in Figure J, select the System Image Recovery tile.
Figure J
From the Troubleshoot screen, select the Advanced options tile.
When you see the Advanced options screen, as shown in Figure J, select the System Image Recovery tile.
Figure J
 From the Advanced options screen, select the System Image Recovery tile.
You'll then be prompted to choose the operating system that you want to
recover, as shown in Figure K. Now, when performing a system image
recovery operation, it seems redundant to have to select the operating
system, but you must click the Windows 8 tile to get started.
Figure K
From the Advanced options screen, select the System Image Recovery tile.
You'll then be prompted to choose the operating system that you want to
recover, as shown in Figure K. Now, when performing a system image
recovery operation, it seems redundant to have to select the operating
system, but you must click the Windows 8 tile to get started.
Figure K
 Choose Windows 8
 The Re-image your computer wizard will immediately begin looking for media containing the system image.
When it can't find the system image, it will prompt you to insert a
disc. Take note that when restoring from DVD, you must first insert the
final disc in the set, as shown in Figure M. The reason being is that
when you create a system image, information required by the restore
operation is saved on the final disc.
Figure M
The Re-image your computer wizard will immediately begin looking for media containing the system image.
When it can't find the system image, it will prompt you to insert a
disc. Take note that when restoring from DVD, you must first insert the
final disc in the set, as shown in Figure M. The reason being is that
when you create a system image, information required by the restore
operation is saved on the final disc.
Figure M
 Information required by the restore operation is saved on the final disc.
When you insert the final disc, the Re-image your computer wizard will
read the information on the final disc and then display the details of
the system image, as shown in Figure N. As you can see, my system image
is on drive F, it was created on 2/25 at 11:28 PM, and it is the image
for the computer named Jovian-8. When you are ready, just click Next.
Figure N
Information required by the restore operation is saved on the final disc.
When you insert the final disc, the Re-image your computer wizard will
read the information on the final disc and then display the details of
the system image, as shown in Figure N. As you can see, my system image
is on drive F, it was created on 2/25 at 11:28 PM, and it is the image
for the computer named Jovian-8. When you are ready, just click Next.
Figure N
 When Re-image your computer wizard is ready to begin, it will display the system image details.
You'll then see the second screen of the Re-Image Your Computer wizard,
as shown in Figure O. As you can see, this screen provides you with
several options. If you are restoring to the same hard disk, you don't
need to select the Format and repartition disks check box. (For my
example, I selected the Format and repartition disks check box, just to
see if that changed the process in any way. Other than possibly adding a
little time to the process, the steps and the end result were the
same.) If you are restoring to a new hard disk, chances are that the
Format and repartition disks check box will be selected by default and
will be unavailable. If that is the case, there is nothing to worry
about as long as the new hard disk is of the same capacity or greater
than the old one.
Figure O
When Re-image your computer wizard is ready to begin, it will display the system image details.
You'll then see the second screen of the Re-Image Your Computer wizard,
as shown in Figure O. As you can see, this screen provides you with
several options. If you are restoring to the same hard disk, you don't
need to select the Format and repartition disks check box. (For my
example, I selected the Format and repartition disks check box, just to
see if that changed the process in any way. Other than possibly adding a
little time to the process, the steps and the end result were the
same.) If you are restoring to a new hard disk, chances are that the
Format and repartition disks check box will be selected by default and
will be unavailable. If that is the case, there is nothing to worry
about as long as the new hard disk is of the same capacity or greater
than the old one.
Figure O
 The second screen in the Re-Image Your Computer wizard provides you with a number of options to choose from.
If you have multiple drives you can click the Exclude Disks button and
choose the drive(s) you want to leave untouched. If you click the
Advanced button, you'll see a dialog box that will present you with two
additional options. An Automatically Restart check box will be selected
by default and you'll have the option to enable a disk check operation
as a part of the procedure. (Now, if none of the options are available
on this dialog box, you may have to install drivers for the disks you
are restoring by clicking the Install Drivers button.)
When you click Next, you'll see the confirmation screen of the Re-Image
Your Computer wizard, as shown in Figure P. To continue, just click
Finish.
Figure P
The second screen in the Re-Image Your Computer wizard provides you with a number of options to choose from.
If you have multiple drives you can click the Exclude Disks button and
choose the drive(s) you want to leave untouched. If you click the
Advanced button, you'll see a dialog box that will present you with two
additional options. An Automatically Restart check box will be selected
by default and you'll have the option to enable a disk check operation
as a part of the procedure. (Now, if none of the options are available
on this dialog box, you may have to install drivers for the disks you
are restoring by clicking the Install Drivers button.)
When you click Next, you'll see the confirmation screen of the Re-Image
Your Computer wizard, as shown in Figure P. To continue, just click
Finish.
Figure P
 To complete the Re-Image Your Computer wizard, just click Finish.
Of course, there is one more confirmation to work through, as shown in Figure Q. Just click Yes to get started.
Figure Q
To complete the Re-Image Your Computer wizard, just click Finish.
Of course, there is one more confirmation to work through, as shown in Figure Q. Just click Yes to get started.
Figure Q
 Just click Yes in the final confirmation dialog box.
You'll then be prompted to insert the first DVD in the set, as shown in Figure R. Once you do so, just click OK.
Figure R
Just click Yes in the final confirmation dialog box.
You'll then be prompted to insert the first DVD in the set, as shown in Figure R. Once you do so, just click OK.
Figure R
 Once the operation is set to begin, you'll be prompted to insert the first disk in the set.
In a moment, the restore operation will begin and you'll see a progress
bar that keeps you apprised of the status of the restore operation.
Depending on how big your hard disk is, the restore operation can take a
few hours. As each DVD in the set is restored, you'll be prompted to
insert the next one.
When the restore operation is complete, you'll be prompted to click the
Restart now button. If you happen to be away from your desk when this
occurs, your system will restart on its own, as shown in Figure S.
Figure S
Once the operation is set to begin, you'll be prompted to insert the first disk in the set.
In a moment, the restore operation will begin and you'll see a progress
bar that keeps you apprised of the status of the restore operation.
Depending on how big your hard disk is, the restore operation can take a
few hours. As each DVD in the set is restored, you'll be prompted to
insert the next one.
When the restore operation is complete, you'll be prompted to click the
Restart now button. If you happen to be away from your desk when this
occurs, your system will restart on its own, as shown in Figure S.
Figure S
 If you happen to be away from your desk when the restore operation is complete, your system will restart on its own.
When, your system restarts, you'll see the familiar logon screen.
If you happen to be away from your desk when the restore operation is complete, your system will restart on its own.
When, your system restarts, you'll see the familiar logon screen.


Launching System Image Recovery In the case of a hard drive failure, you can restore Windows 8 by running the System Image Recovery tool from the Recovery Drive. While I am booting from a USB Recovery Drive, you can just as easily boot the Recovery Drive from the optical disc. (As a part of my research for this article, I ran the System Image Recovery tool after booting from an optical disc and the procedure is basically identical.) After your system boots from the Recovery Drive and you are prompted to choose an option, select the Troubleshoot tile as shown in Figure H. Figure H


The recovery process
As soon as you click the Windows 8 tile, you'll see the Re-image your computer wizard and the tool will immediately begin looking for media containing the system image, as shown in Figure L. Figure L


No comments:
Post a Comment